
TheWorkbench
The Workbench is made for playful fiddling with knobs, buttons and handles while simply trusting your ears. Learning by doing is the idea, so there is no need to read this manual cover to cover.
The plugin has a tour built in: Quick Tour and Deep Dive. Start it under Settings › General or with the info button.
Fast to reach. Easy to shape.
Sample View is one of the two main views of The Workbench. Pick a sound and shape it while you hear every change in real time.
Your workbench
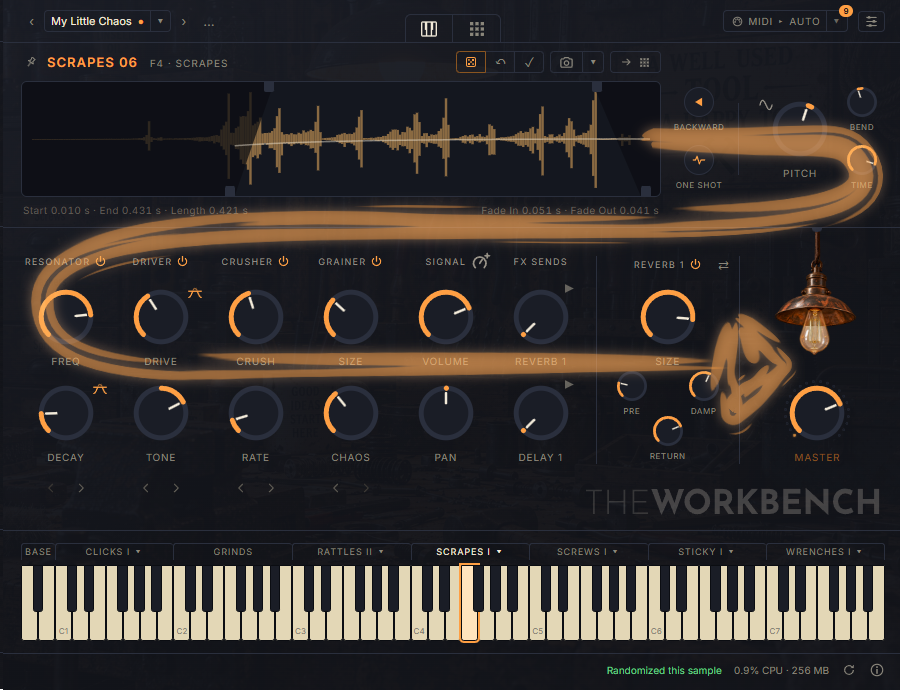
This is where sound design happens. Every knob and effect that shapes a sample lives here, so if you are adventurous like Harry, you will probably spend most of your time in this view. Sound Shaping
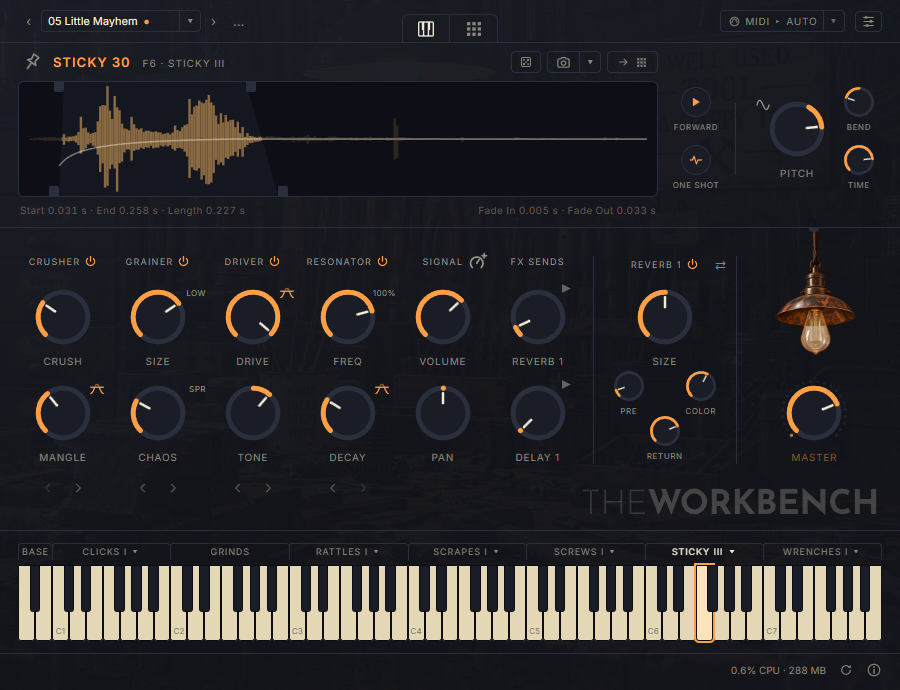
- Preset Step through presets with the arrow buttons, or open the ⋯ menu to save, rename or import. An orange dot marks unsaved changes. Presets
- View switch Toggles between Sample View and Pad View.
- MIDI target Incoming MIDI follows the current view by default, or can be fixed to the pads or the samples. MIDI target
- Settings Opens the Settings: General, Macros, MIDI, Snapshots and License. Settings
- Pin Holds the controls on the current sample while you play other notes. Sample Pin
- Sample bar Shows the sample you played last, with its key and Group.
- Sample tools The dice randomizes the sample, the camera takes a snapshot and the arrow assigns it to a pad. Dice, Snapshots
- Waveform Drag the handles to set Start, End and the fades. Click to trigger the sound. Sound Shaping
- Playback and Pitch Play the sample in reverse, let it ring out or stop it with the key, and pitch it several octaves up or down. Bend and Time add a pitch sweep to every hit. Sound Shaping
- Insert effects Resonator, Driver, Crusher and Grainer, each with its own power button. The arrows move a unit within the chain. Insert Effects
- Signal and FX Sends Volume and Pan, and two sends that feed the shared effects. The small icon beside Signal opens the Signal panel with Filter, Width and more. Sound Shaping
- Shared effects Two Reverbs and two Delays that every note can send to. The arrows button switches between their panels. Reverb & Delay
- Master The output level of the whole plugin. It belongs to the project, not to the preset.
- Keyboard and Groups Every key plays a sample, one octave per Group. The band above a Group switches its Sample Set. Groups & Sample Sets
- Status bar Messages, CPU and memory use. The info button opens the About screen with the version, documentation and the Quick Tour.
MIDI target
By default, incoming MIDI follows the current view (Sample View or Pad View). The MIDI ▸ menu lets you lock it to one view. MIDI then keeps playing that view, even while you work in the other.
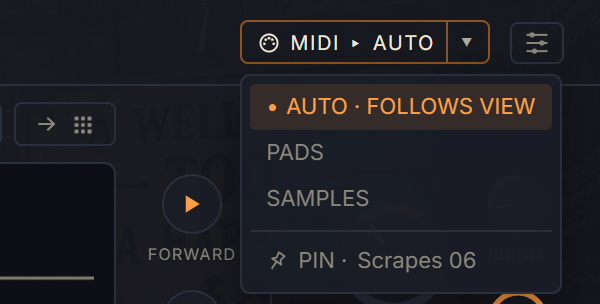
- Auto The default. MIDI plays the view you see: the samples in Sample View, the pads in Pad View.
- Pads Always the pads, even in Sample View.
- Samples Always the samples, even in Pad View.
- Pin Holds the controls on one sample. Sample Pin
Your DAW plays a beat on your pad kit. Set the MIDI target to Pads, switch to Sample View and shape a sample while the beat keeps running.
You can also give the pads a dedicated MIDI channel in Pad View. That binds not only your DAW but also a hardware controller to the pads, whatever view is open. Fixed MIDI channel
Every sound at your fingertips.
All samples are mapped across the keyboard, so you reach any sound instantly by just pressing a key.
The on-screen keyboard does more than show the note you play. Click a key with the mouse to select its sample for editing: even when the pin holds the controls on one sample, a click moves the pin along. A click on a Group’s band switches that Group to another Sample Set.
- 208 one-shot samples
- Seven Groups: Clicks, Grinds, Rattles, Scrapes, Screws, Sticky, Wrenches
- One octave per Group, from C1 to B7
- Sine, White Noise and Pink Noise just below C1: for a simple kick, or to layer with other samples
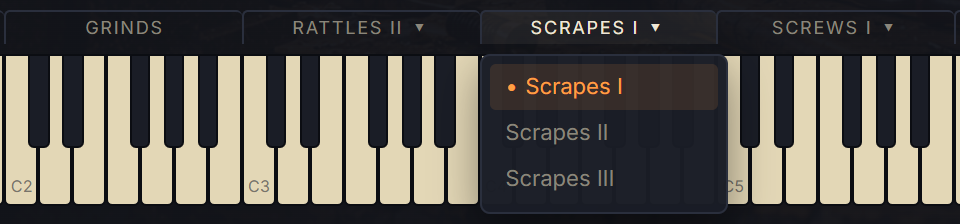
Some Groups hold more samples than fit on one octave, so you can switch between several Sample Sets.
- Each Sample Set brings 12 more unique samples to the Group
- Click a Group’s band above the keyboard to switch
- The choice is stored in the preset
Play your own kit.
Pad View is where you build your own kits: place your favourite samples on the 16 pads of a kit and play them like a drum machine.
Each pad can layer up to three samples, each with its own level and timing, so a hit can combine, say, a snap, a thump and a burst of noise. For even more freedom, every pad can be routed to its own output in your DAW. There you can expand the built-in effects chain with your favourite third-party plugins. Building Kits
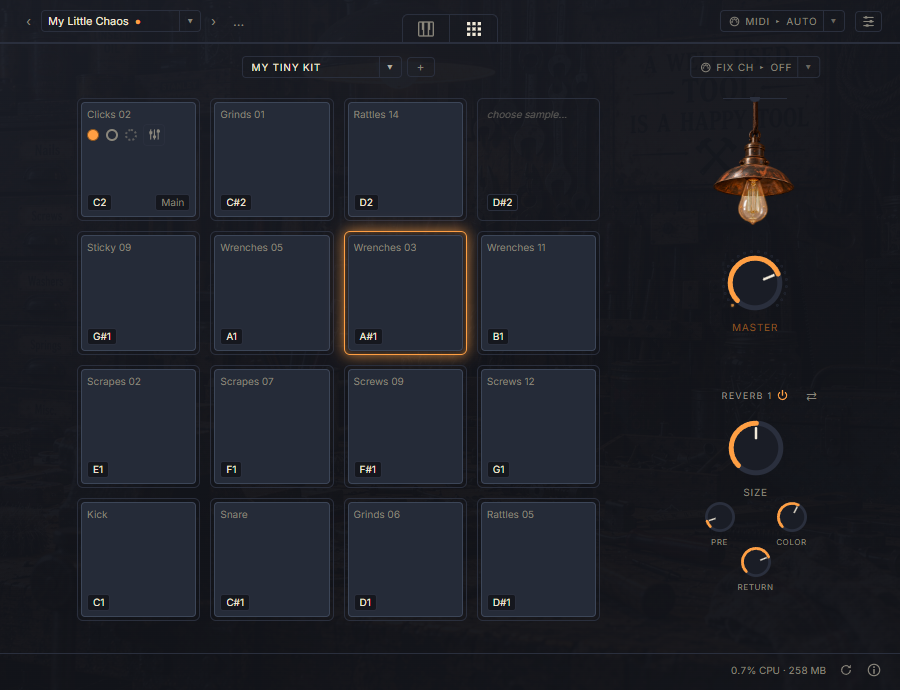
- Pad Kit A kit has 16 pads. Add more kits with the plus: a preset holds up to 16 kits. Building Kits
- Pad Channel Fixes one MIDI channel to the pads, for controllers whose pads send on their own channel. Building Kits
- A pad Layer dots and the layer edit button (up to three samples per pad), the pad’s MIDI note and its output, Main or one of sixteen Pad outputs. Building Kits
- Master and shared effects The output level of the whole plugin and the Reverb and Delay panels, as in Sample View. Reverb & Delay
From waveform to Master Out.
You shape each sound in Sample View. Read the signal flow from top to bottom and left to right.
- FX Sends feed the shared Reverb and Delay, which return to Master Out. FX Sends · Reverb & Delay
- AUX outputs take a send to your DAW instead, to process it with your own plugins. FX Sends · Outputs
- Pad outputs let every pad in Pad View leave on its own output instead of Main. Outputs
A normal stereo workflow needs no extra routing. All extra outputs are off by default; enable them in your DAW’s plugin routing.
| Output | Purpose | Default |
|---|---|---|
| Main | Normal stereo plugin output | Active |
| AUX FX 1 and 2 | Optional external effect routing | Off |
| Pad Outputs 1–16 | Dedicated routing for Pad View | Off |
Shape each sound.
Sample & playback
- Waveform
- Drag the handles to set Start, End and fades.
- Left- or right-click to trigger.
- Wheel zooms; Ctrl + wheel changes amplitude; Shift + wheel or dragging pans.
- Double-click resets zoom.
- When zoomed in, left-click no longer triggers, but right-click still does.
- Direction Backward reverses playback; Forward plays it as recorded.
- One Shot / Gate One Shot plays the sample to its end, even if you let go of the key. In Gate mode the sound stops as soon as you release the key or mouse button.
- Pitch Tune the sample. The small icon next to the knob switches the pitch mode (stored per sample):
- Smooth – interpolated, the default
- Lo-Fi – no interpolation, stepped and gritty
- Shift – also shifts frequencies, bell-like and metallic
- Bend & Time Set the pitch change at the start of a hit and how quickly it returns.
Insert effects
- Every sample has its own set of FX inserts
- Four effects: Crusher, Grainer, Driver, Resonator (what they do)
- Each knob steers several parameters at once. So the interface stays clear, and you keep the effects that Harry thinks suit percussive samples best
- Switch each on or off, drag to reorder or use the arrows
Want more effects, with more control? Route your samples via the pads to their own DAW output and use your DAW’s effects or your favourite third-party plugins there. Outputs
Signal
Signal is the end of the channel. Set the level with Volume and the stereo position with Pan.
- The icon opens the Signal panel and lights up when something in the panel is active: a filter, Length, or Width below 100 %. Signal panel
Signal panel
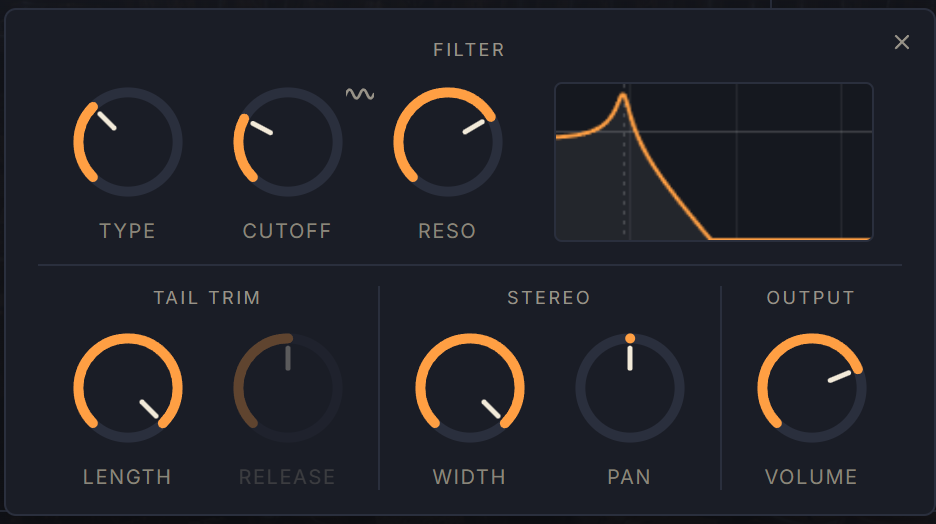
- Filter Type picks Off, low-pass, band-pass or high-pass; Cutoff sets the frequency, Reso adds a peak there. It sits at the end of the effect chain, before Length.
- Filter LFO The small wave icon at Cutoff opens the Filter LFO, which sweeps the Cutoff automatically.
- Filter curve An animated display of the Filter: you see it react in real time as you change Type, Cutoff and Reso, and it shows the movement of the LFO too.
- Tail Trim Length and Release shorten only the tail the effects add after the sample has ended, for example a long Resonator tail. The Reverb and Delay sends get the shortened sound.
- Stereo Width narrows the sample from its original stereo width (100 %) down to mono (0 %). At mono, left and right are summed, so parts that differ between the sides can get quieter. The centre is raised a little as you narrow the sample, so it stays about as loud.
- Pan and Output Volume are the same controls as in the Signal slot.
The panel stays open when you play. Click the waveform with the mouse or play a key to trigger the sample, and hear every change while you turn the knobs.
Filter LFO
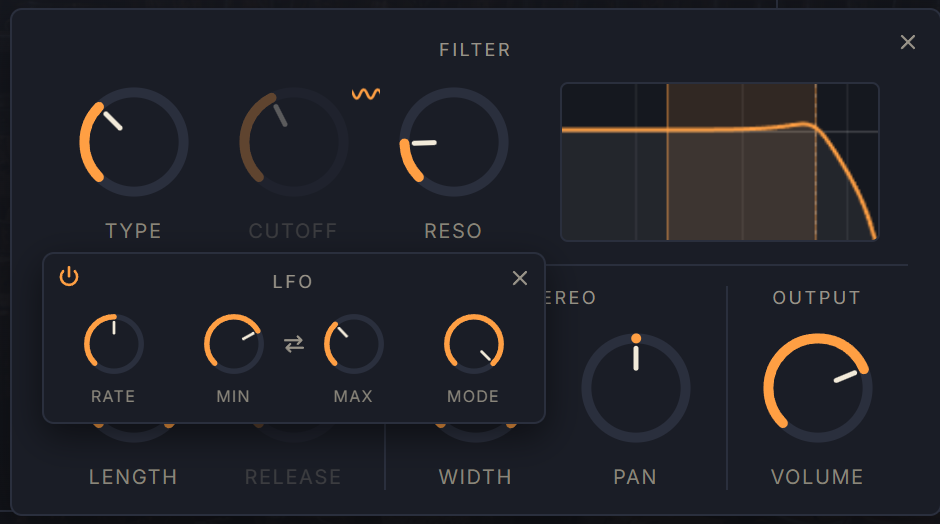
- On / off The power button switches the LFO; it starts off. Turning one of its knobs by hand switches it on, too. If Type is Off, switching it on sets Type to LP. While it runs, Min and Max replace the Cutoff knob.
- Rate How long one sweep takes, as a note length from 4 bars to 1/64. It follows your DAW’s tempo, or 120 BPM without one.
- Min / Max The two Cutoff frequencies the LFO swings between. The arrows button between them swaps the two, which reverses the direction of the sweep.
- Mode Free keeps running in step with your DAW. Hit Loop restarts at Min on every hit. Hit Once sweeps from Min to Max once per hit, then stays at Max.
FX Sends
Every sample has two FX Sends. Each knob sets the level feeding one effect. It is pre-fader: tapped before Volume, so the Volume knob doesn’t change it.
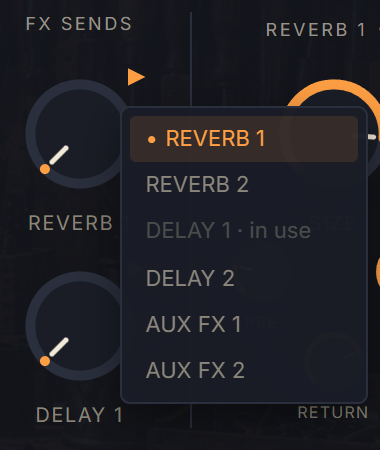
- Routing menu The arrow next to a send knob opens the menu where you pick its target.
- Internal effects Reverb 1 and 2 and Delay 1 and 2 are shared: samples that point at the same one share the same room or delay. See Reverb & Delay.
- In use The two sends of a sample can’t point at the same target. A target the other send already uses is marked “in use”.
- AUX FX Two optional extra stereo outputs for processing the send with plugins in your DAW. They are off by default and must be enabled in your host; a disabled AUX output stays silent. See Outputs.
Dice
Feeling lucky? The dice next to the sample name rolls new settings for the sample you are looking at and plays it right away. Not every roll will be a hit, but it is a great starting point and a good source of inspiration.

- Dice Rolls new settings for the current sample and plays it.
- ↶ Revert Returns to the settings from before the first roll. Appears after the first roll.
- ✓ Keep Accepts the current sound. Revert and Keep are optional and not saved.
Found a roll you like? Keep it as a snapshot.
Stays as it is: Volume, Pan, Width, the sends and the tail trim. The Filter is switched off.
Rolled: everything else, including Reverse, the order of the effect units and the small switches of the Grainer and Resonator. Each effect unit is switched on more often than off, so not every unit plays in every roll. Start and end are kept far enough apart that a good part of the sample always remains, and the fades stay short.
Sample Pin
Normally the controls follow the last played MIDI note. The pin holds them on one sample instead.
- Pin
- Click it to keep editing this sample while other MIDI notes play.
- Click again to follow your MIDI playing.
- Clicking a key on the on-screen keyboard selects that sample and moves the pin along.
- The pin isn’t saved with your project.
- Pin The MIDI ▸ menu at the top right of the header has this entry too. It works like the pin. MIDI target
Without the pin, every note that plays moves the controls to its sample, so a running beat keeps pulling them away. With the pin, your DAW can play the whole pattern while you keep shaping one sound: tune the snare, open the filter, add some drive, and hear it in context right away.
When the selection changes
The selected sample is the one the controls edit and your learned MIDI controls act on. It is highlighted on the on-screen keyboard. Four rules decide when it changes:
- Clicking a sample selects it, even with the pin on. The pin moves along. In Pad View, clicking a layer icon does the same and also opens Sample View.
- A MIDI note that plays a sample selects it, but only without the pin.
- A pad hit never selects anything, with or without the pin, by mouse or by MIDI. The pad just sounds and lights up.
- Switching views never changes the selection.
Selects the sample becomes the selected one Moves pin the pin jumps to that sample Sound only it plays, the selection stays → Sample View the view switches to Sample View
| You do this | Pin off | Pin on |
|---|---|---|
| Clicka key | Selects | Moves pin |
| Clicka sample link in Settings | Selects | Moves pin |
| MIDItarget Auto or Samples | Selects | Sound only |
| MIDItarget Pads | Sound only | Sound only |
| MIDIfixed pad channel | Sound only | Sound only |
| You do this | Pin off | Pin on |
|---|---|---|
| Clicka pad | Sound only | Sound only |
| Clicka layer icon | Selects→ Sample View | Moves pin→ Sample View |
| Clicka sample link in Settings | Selects→ Sample View | Moves pin→ Sample View |
| MIDItarget Auto or Pads | Sound only | Sound only |
| MIDItarget Samples | Selects | Sound only |
| MIDIfixed pad channel | Sound only | Sound only |
What you play in Pad View never takes away the sample you are working on.
Play the pads on a fixed pad channel and your MIDI keyboard on another channel with the MIDI target set to Samples. The MIDI keyboard then selects samples as you play (the notes sound too), and the pads never disturb the selection.
Four effects for every sound.
Every sample has its own Crusher, Driver, Grainer and Resonator. Switch them on with the power button, or simply turn a knob.
Play around and don’t be shy. Push the knobs to the extremes and trust your ears: some of the best sounds hide where it gets a little too much.
Crusher
Lo-fi grit: it degrades the sound digitally.
- Crush A journey back through digital history: resolution and sample rate drop together, from CD quality through a 12-bit drum sampler and an 8-bit home computer down to 2 bits.
- Mangle Destroys the signal in three stages: first the peaks overflow and jump to the other end, then bits flip, and at the top come dropouts and stutters. It works with Crush at zero, too.
- Auto On by default: it keeps the level roughly constant as Mangle rises, so Mangle changes the character, not the loudness.
Driver
Saturation and distortion, from gentle warmth to hard clipping.
- Drive How hard the signal is pushed into the clipping curve.
- Tone Balances the result between darker and brighter.
- Auto On by default: it keeps the level roughly constant as Drive rises, so Drive changes the character, not the loudness. Switch it off if you want Drive to get louder.
Grainer
Cuts the sound into tiny grains and scrambles them.
- Size The length of each grain, from 0.1 to 250 ms. Very short grains turn the sound into a crackle, like rain or fire.
- Pitch switch Click to step through: UNI keeps the original pitch, HI adds grains an octave up, LOW an octave down, RND randomly one or the other. The hit itself keeps its pitch.
- Chaos At 0 % the sound passes through unchanged. Turning it up scatters the grains, spreads them in stereo, adds octave and fifth grains and backward swells. Above 70 % a tail of grains rings on after the sample.
- Density switch NRM is the normal grain flow. ZAP sweeps the grains like a laser, RNG shifts each grain by its own random amount for a metallic, glittering sound, and SPR leaves gaps between shorter grains.
Resonator
Makes the sound ring at a pitch you choose.
- Freq Sets the pitch of the resonance.
- Mix switch Click to step through: at 100% you hear only the Resonator. At 50% and 25% the original hit comes back at its own level, with the ringing mixed in below it.
- Decay How long it rings.
- Auto On by default: it keeps the level roughly constant as Decay rises, so Decay changes the length, not the loudness.
Too much ring? The Resonator can leave a long tail behind the sample. Shorten it again with Tail Trim in the Signal panel, which opens from the icon next to SIGNAL. Tail Trim
The order matters.
Crusher, Driver, Grainer and Resonator can be rearranged independently for every sample.
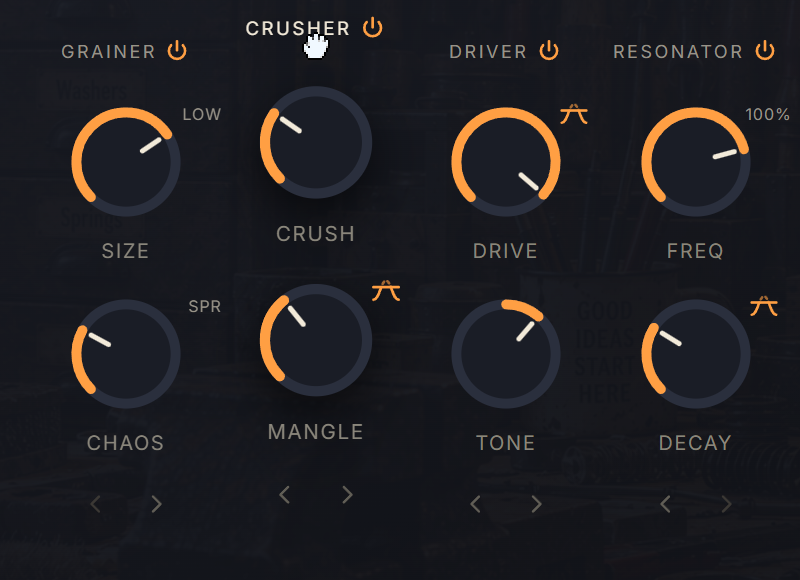
- Label Drag an effect by its label to move it; the others make room.
- Arrows Use the arrows below an effect’s slot to move it one place left or right.
The same effects sound different depending on their order:
- Driver → Resonator The Resonator rings on a saturated sound, so the tone is rich in overtones.
- Resonator → Driver The Driver saturates the ringing tail, so it grows harder and more aggressive.
- Grainer → Resonator Every scrambled grain excites the Resonator, so you get pitched textures.
- Resonator → Grainer The Grainer chops the ringing tone into stuttering fragments.
Just try it out. Drag the effects around and listen to what happens: the order changes the character of a sound more than you might expect.
And don’t forget: you can always use the dice when you’re feeling lucky. It rolls the order of the effects too. Dice
Shared Reverbs and Delays. A complete kit.
Two Reverbs and two Delays are shared send effects rather than separate processors for every individual sound.
Each note’s voices share its channel, and any sound can send into the same Reverb or Delay to help the kit sit together.
These effects are made for quick, characterful results. They are not meant to compete with dedicated effect plugins. For truly high-quality Reverbs or Delays, send to an AUX FX output and process it with third-party plugins in your DAW. FX Sends · Outputs
Reverb 1 & 2
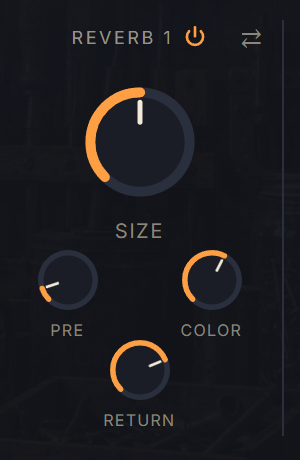
Use one Reverb for a short room and the other for a long tail. Each has an on/off button in its column header.
- Size The size of the room.
- Pre The pause before the reverb sets in (Pre-Delay).
- Color Turns the tail from bright to dark. Past the middle it sinks “under water”: muffled, with a low hump, a slow wobble and some grit on louder hits.
- Return How loud the Reverb is mixed back into the output.
Delay 1 & 2
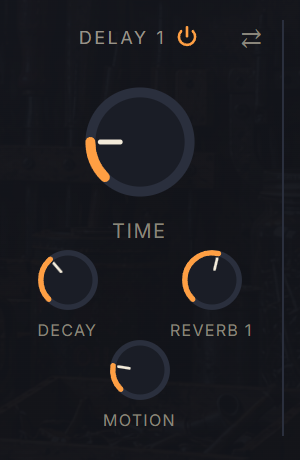
Echoes that follow your tempo. The very short times go beyond a classic delay: they add a second layer that shapes the sound itself.
- Time A note length that follows the host tempo, from 1/4 down to 1/64, including triplets.
- Decay How long the repeats take to fade away, from a single echo up to 6 seconds. The length stays the same whatever Time is set to, so short times just give more, denser repeats.
- Reverb Feeds the repeats into a Reverb. Click its label to choose which one (Reverb 1 by default).
- Motion First makes the repeats bounce between left and right (ping-pong). Further up it blends in a phaser that follows your tempo and sweeps faster toward the top.
The ⇄ button in the effects column steps through Reverb 1, Reverb 2, Delay 1 and Delay 2. Which effect a sample sends to is set in its FX Sends.
Build a playable kit.
Pad View offers a 4×4 MPC-style performance surface for building kits with multi-layered pads.
Bring your favourite sounds together in a kit and play them from your controller. Layering several samples on a pad extends your arsenal even further.
Kit overview
- Up to 16 kits Multiple kits can be stored inside a preset. Give a kit a name of your own with the pencil in the kit list.
- Pad Channel Fixes one MIDI channel to the pads, for controllers whose pads send on their own channel.
- Up to 3 layers A pad can trigger as many as three samples at once.
- 16 pads per kit Each kit contains sixteen playable pads.
Inside a pad
Click an empty spot on a pad to trigger it. The other elements on the pad let you edit its properties.
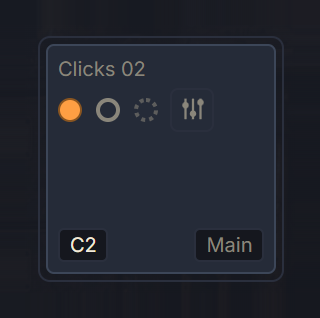
- Pad name Shows the name of the first layer’s sample by default. Double-click it to give the pad a name of your own; clear the field to go back to the default.
- Layer dots One dot per layer, up to three:
- Click an empty dot – pick a sample from the list of all available samples
- Click a filled dot – opens that layer’s sample in Sample View
- Right-click – lets you remove a layer
- Layer edit Opens a small panel with the Level and Offset of each layer, see Layer edit.
- MIDI note Every pad plays on one MIDI note. Click it to change the note:
- Press a key on your MIDI controller – the pad takes over that note
- Or type a note name or number, for example C3 or 60, and press Enter
- Any pad can use any note, from 0 to 127
- Output Main or one of the sixteen Pad outputs. Outputs marked “inactive” must be enabled in your DAW’s plugin routing first. Outputs
Use the individual DAW outputs of the pads to process them further with your DAW’s effects or your favourite third-party plugins. This way, the already vast sound shaping possibilities become truly endless … Outputs
Layer edit
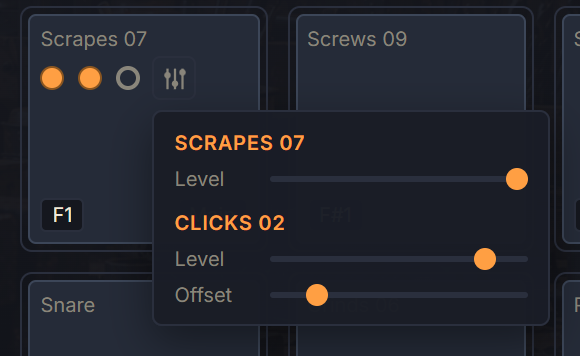
- Layers Every layer with a sample is listed here by the name of its sample.
- Level How loud this layer plays within the pad, for example to tuck a noise layer in quietly under the main hit.
- Offset Starts this layer up to 500 ms later than the others, so the sounds do not all hit at the same instant. Only layers 2 and 3 have it: layer 1 is the reference that starts with the hit, and the others are timed relative to it.
Assign to Pad
- The button with the pads symbol in Sample View puts the current sample on a pad.
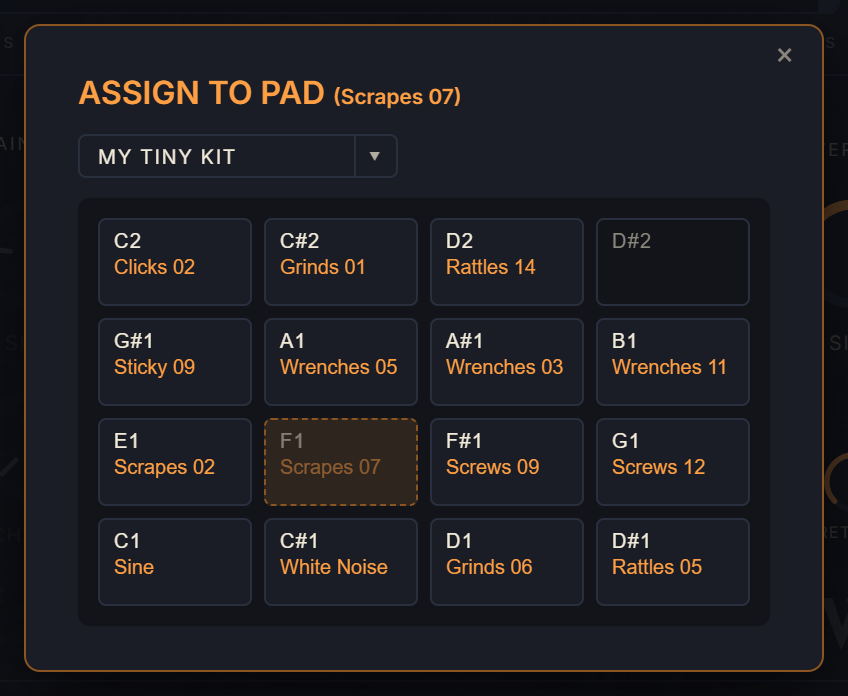
- Kits Select the kit you want to assign the sample to. The same sample can be assigned to multiple kits and multiple pads.
- Pads Click a pad. An empty pad takes the sample as its first layer right away. If the pad already has samples, a small menu lets you add the sample as the next layer or replace one of the existing layers.
- Disabled pad A pad that already plays this sample is dimmed with a dashed border and cannot be chosen again.
Every pad plays on its own, with its own output and ring-out and no choke between pads. The same sample can sit on several pads and sound on all of them at once. The channel settings (knobs, effects, sends, Gate) belong to the sample and apply to every pad that uses it.
Fixed MIDI channel for kits
If your hardware controller’s pads send on their own MIDI channel, the FIX CH button at the top right of Pad View lets you fix that channel to the pads.
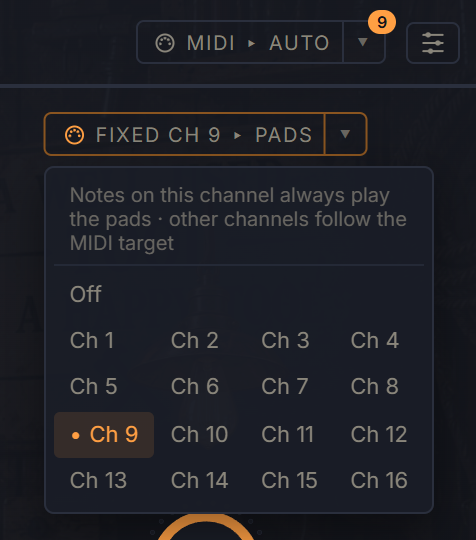
- FIX CH Opens the channel menu. The choice is saved with the DAW project.
- Off The default: the pads follow the MIDI target.
- Channels 1 to 16 Notes on the chosen channel always play the pads, in either view, and never select a sample. Set just the pad section of your controller, or a second controller, to that channel to play the pads while the rest of your controller plays and selects samples.
- Channel badge A small badge on the MIDI target button shows the fixed channel.
With default routing, Live passes every note on channel 1. On a separate MIDI track, set MIDI From to your controller and its channel, then under MIDI To choose the track with The Workbench in the first menu and the channel in the second menu. Set the Pad Channel in the plugin to that same channel.
Automate the things that matter.
Twelve assignable Macros expose selected per-sound controls to DAW automation without adding thousands of parameters.
A Macro can have up to eight targets, and each target is one control of one specific sample. Assigning Crush on one sample leaves the Crush of every other sample alone; to move those too, assign them as well. One Macro can, for example, raise Crush on several selected sounds, add Grain Chaos to another and lower Tone on a third, all in a single movement.
The Macro knobs
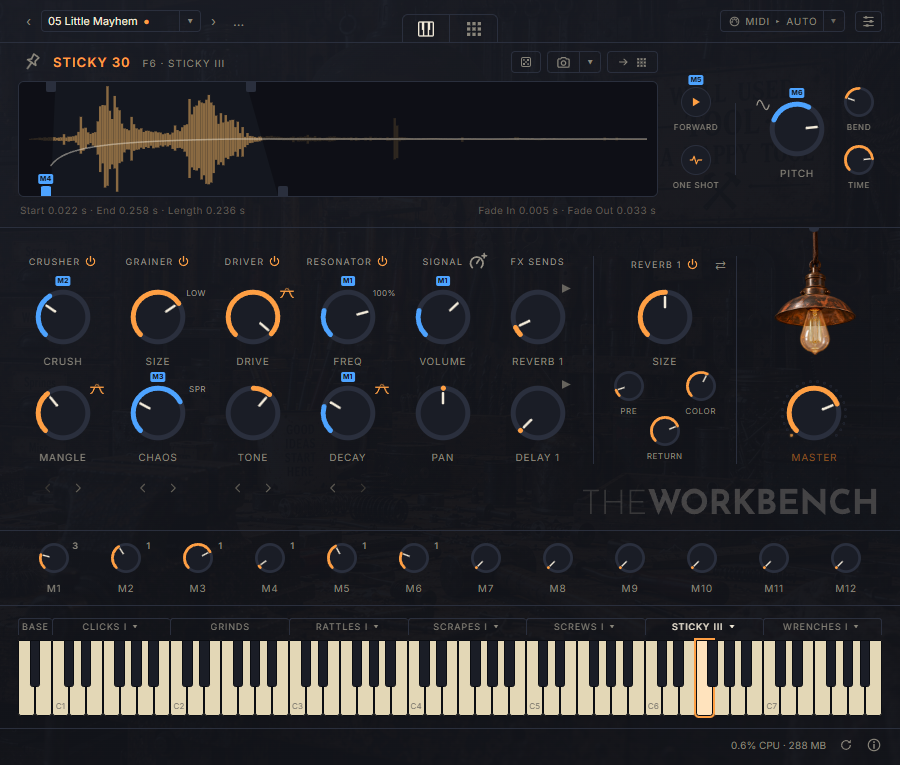
- Macro knobs Twelve knobs that your DAW sees as automatable parameters. The row appears as soon as at least one control is assigned to a Macro.
- Targets The small number beside a Macro shows how many controls it drives.
- Macro tag A blue tag on a control shows which Macro it belongs to.
- Locked control While a control belongs to a Macro, the Macro sets its value. The lock cursor shows that turning it by hand has no effect.
- Waveform handle The handles on the waveform can belong to a Macro too, so a Macro can sweep the start point through the sample, for example. Such a handle can’t be dragged by hand.
- Direction switch The Forward/Backward switch can belong to a Macro too, so a Macro can flip the playback direction live.
- 12 Macro knobs: each one appears as a normal automatable plugin parameter in your DAW
- Up to 8 targets per Macro: on one sample or across several
Automation lanes are not the only way to move a Macro. Each Macro is a normal plugin parameter, so your DAW’s modulators, such as LFOs or envelopes, can steer it too. That makes for some very interesting results.
Assigning Macros
Right-click a control to assign it. Waveform handles and the Forward/Backward switch are assignable too; One Shot / Gate is not. A control can belong to one Macro at a time, which takes over its value.
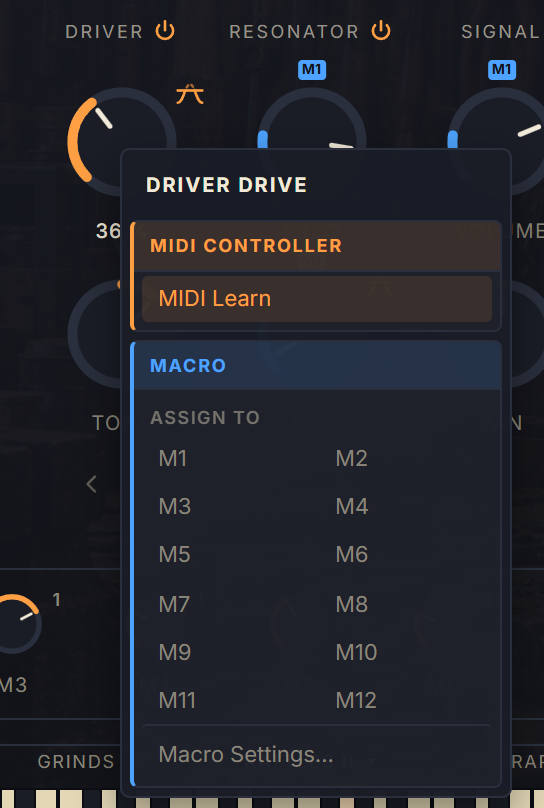
- Assign to Pick a Macro, M1 to M12, to assign the control to it.
- Macro Settings… Opens Settings › Macros, where you can review all assignments. Macro Settings
Macro Settings
Open the Settings with the icon at the top right of the header, then choose the Macros tab. There you see everything assigned to your Macros at a glance, and can fine-tune it.
- Settings Opens the Settings window. Then choose the Macros tab.
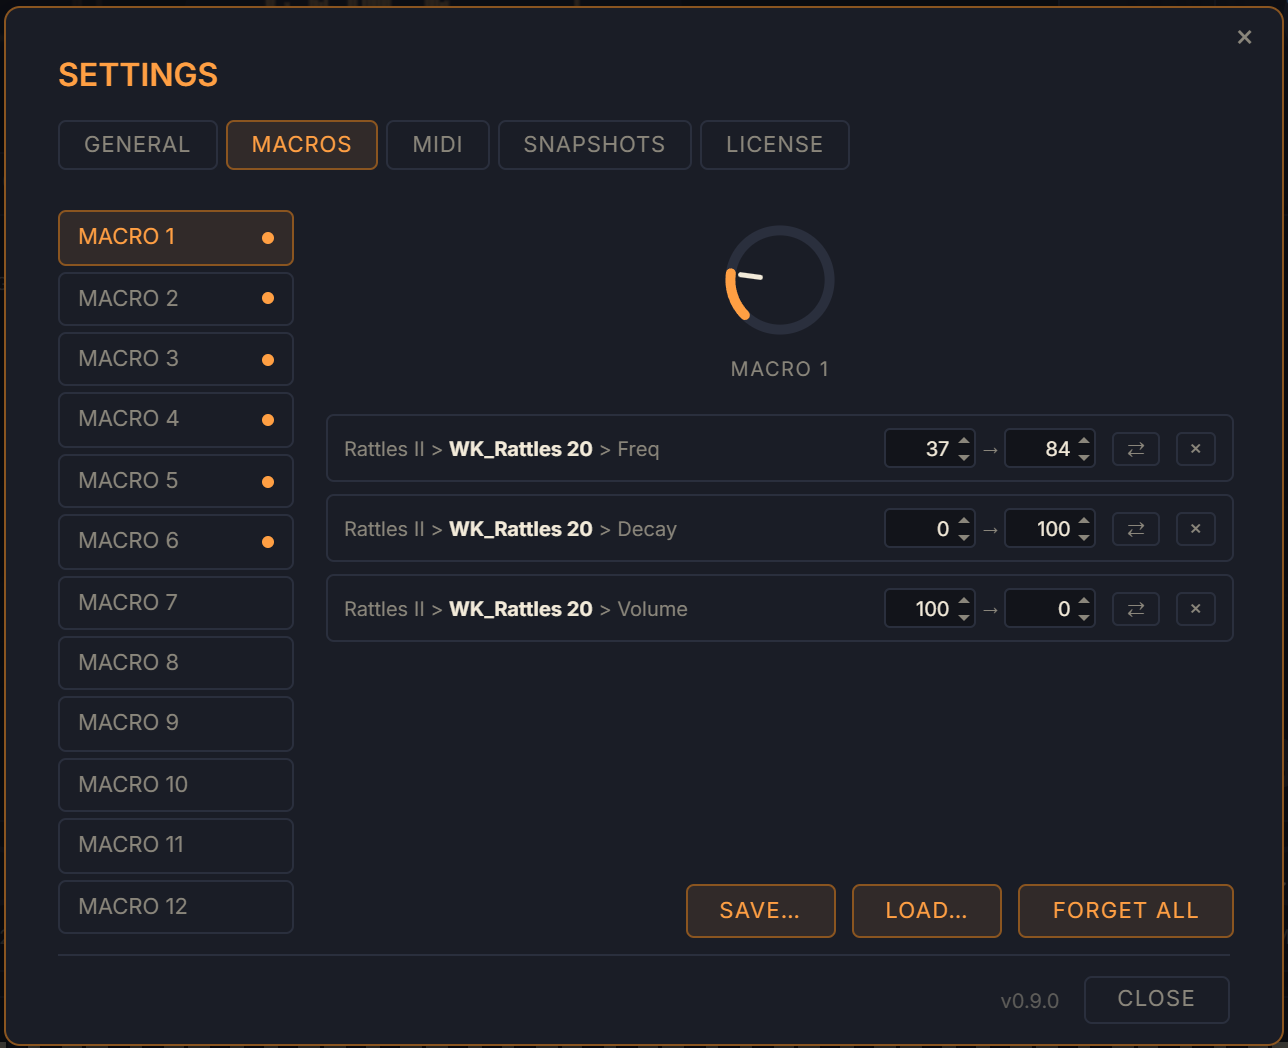
- Macro list Select a Macro. A dot marks Macros that already have targets.
- Target A target is one control of one specific sample, written as Group › sample › control. Here, Macro 1 moves Freq of Rattles 20 in the Rattles II Group. A Macro can have up to eight targets, also on different samples.
- Range The values the Macro moves this control between, from 0 to 100. Its minimum and maximum are set separately for every target.
- Invert Swaps minimum and maximum, so the Macro runs this control in reverse.
- Remove Takes the control out of the Macro.
- Save and Load Save the assignments to a file and load them again, for example to reuse them in another project.
- Forget All Removes every target of every Macro.
Macro assignments belong to the project, not to presets. You can save them separately as a file, though, and load them into another project.
What a Macro can control
| Area | Controls | ||||
|---|---|---|---|---|---|
| Waveform | Start | End | Fade In | Fade Out | Forward / Backward |
| Pitch | Pitch | Bend | Time | Pitch mode | |
| Crusher | Crush | Mangle | |||
| Driver | Drive | Tone | |||
| Grainer | Size | Chaos | |||
| Resonator | Freq | Decay | |||
| Signal | Volume | Pan | |||
| FX Sends | Reverb | Delay | |||
| Filter | Type | Cutoff | Reso | ||
| Filter LFO | On / Off | Rate | Min | Max | Mode |
| Tail Trim | Length | Release | |||
| Stereo | Width | ||||
Not assignable: the power buttons, the Auto switches, the small switches of the Grainer and Resonator, One Shot / Gate, Master, the shared Reverb and Delay knobs and the Macro knobs themselves. Those are plugin parameters of their own, though; see the next section.
Other automatable parameters
Besides the twelve Macros, your DAW can automate Master and the shared effects. Together with the Macros that makes 33 automatable parameters, no matter how many sounds you have loaded. These controls need no assignment: they are in your DAW’s parameter list from the start, under the names below.
| Area | Parameters in your DAW | ||||
|---|---|---|---|---|---|
| Output | Master | ||||
| Macros | Macro 1 … Macro 12 | ||||
| Reverb 1 | Reverb Size | Reverb Color | Reverb Pre-Delay | Reverb Return | Reverb On |
| Reverb 2 | Reverb 2 Size | Reverb 2 Color | Reverb 2 Pre-Delay | Reverb 2 Return | Reverb 2 On |
| Delay 1 | Delay Time | Delay Decay | Delay Reverb Send | Delay Chaos | Delay On |
| Delay 2 | Delay 2 Time | Delay 2 Decay | Delay 2 Reverb Send | Delay 2 Chaos | Delay 2 On |
- Names: two controls are named differently in the DAW. Reverb Send is the Reverb knob of a Delay and Chaos is its Motion knob.
- Delay Time: steps through the note lengths rather than sliding, as on the knob itself
- On switches: switch each Reverb and Delay on and off from the DAW, like the button in its column header
Which Reverb a Delay feeds is set on the plugin only, and so are all per-sound controls, including the FX Sends of each sample. To move those from your DAW, assign them to a Macro.
Put the channel under your hands.
MIDI Learn lets an external MIDI controller manipulate a channel control, so you can shape a sound with real knobs and faders.
This works differently from Macros. A Macro target is tied to one specific sample, so it always moves that sample. A learned CC belongs to the control itself, not to a sample, and acts on whichever sample is shown.
Learning a control
Right-click the control you want to steer and choose MIDI Learn. Then turn a knob or move a fader of a controller that sends a MIDI CC: it is mapped to the control right away.
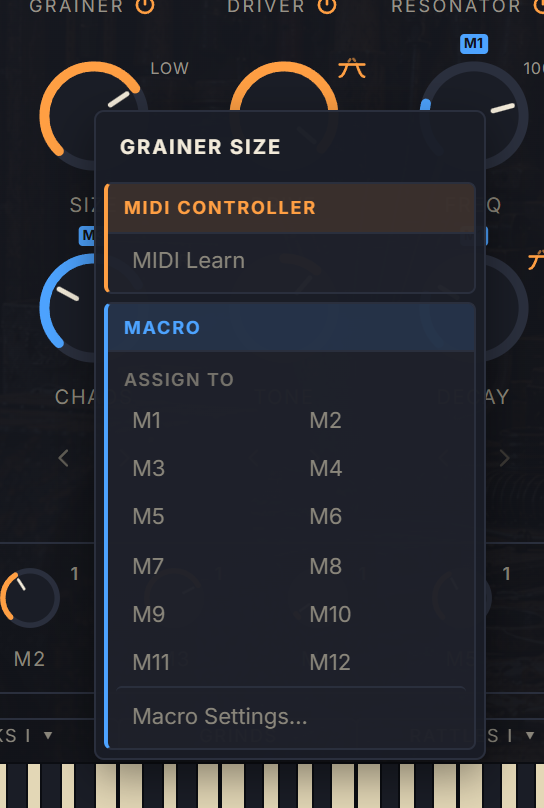
- MIDI Learn Waits for the next CC. Once a control has a CC, this entry becomes Forget CC.
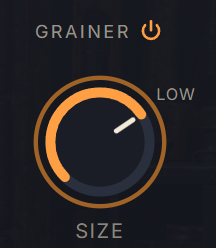
- Learning ring
- The ring marks the control that waits for a CC.
- Move a knob or fader on your controller.
- The ring disappears once the CC is mapped.
- To cancel, press Escape, click elsewhere or choose Cancel MIDI Learn in the right-click menu.
Macro knobs can also be learned. That puts several controls under one controller knob, up to eight, even on different samples. A great fit for live performance. Macros
Learned controls
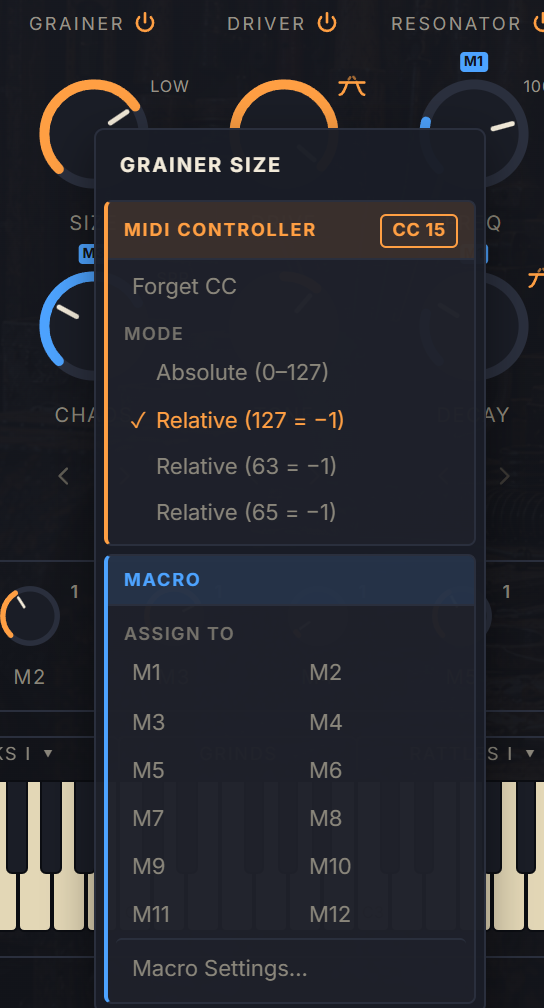
- CC badge The controller number that was learned, here CC 15.
- Forget CC Removes the mapping again.
- Mode How the incoming values are read. The Workbench detects it while learning: here it recognised an endless encoder and checked Relative (127 = −1). If it guessed wrong, pick another mode.
The Workbench automatically detects normal absolute CC controls and relative/endless-encoder behavior. Use Absolute for knobs and faders; the three relative modes cover endless encoders that send 127, 63 or 65 for one step down.
MIDI Settings
The MIDI tab of the Settings lists all your MIDI Learn assignments. Here you can review them at a glance, change their mode, remove them or save them to a file.
- Settings Opens the Settings window. Then choose the MIDI tab.
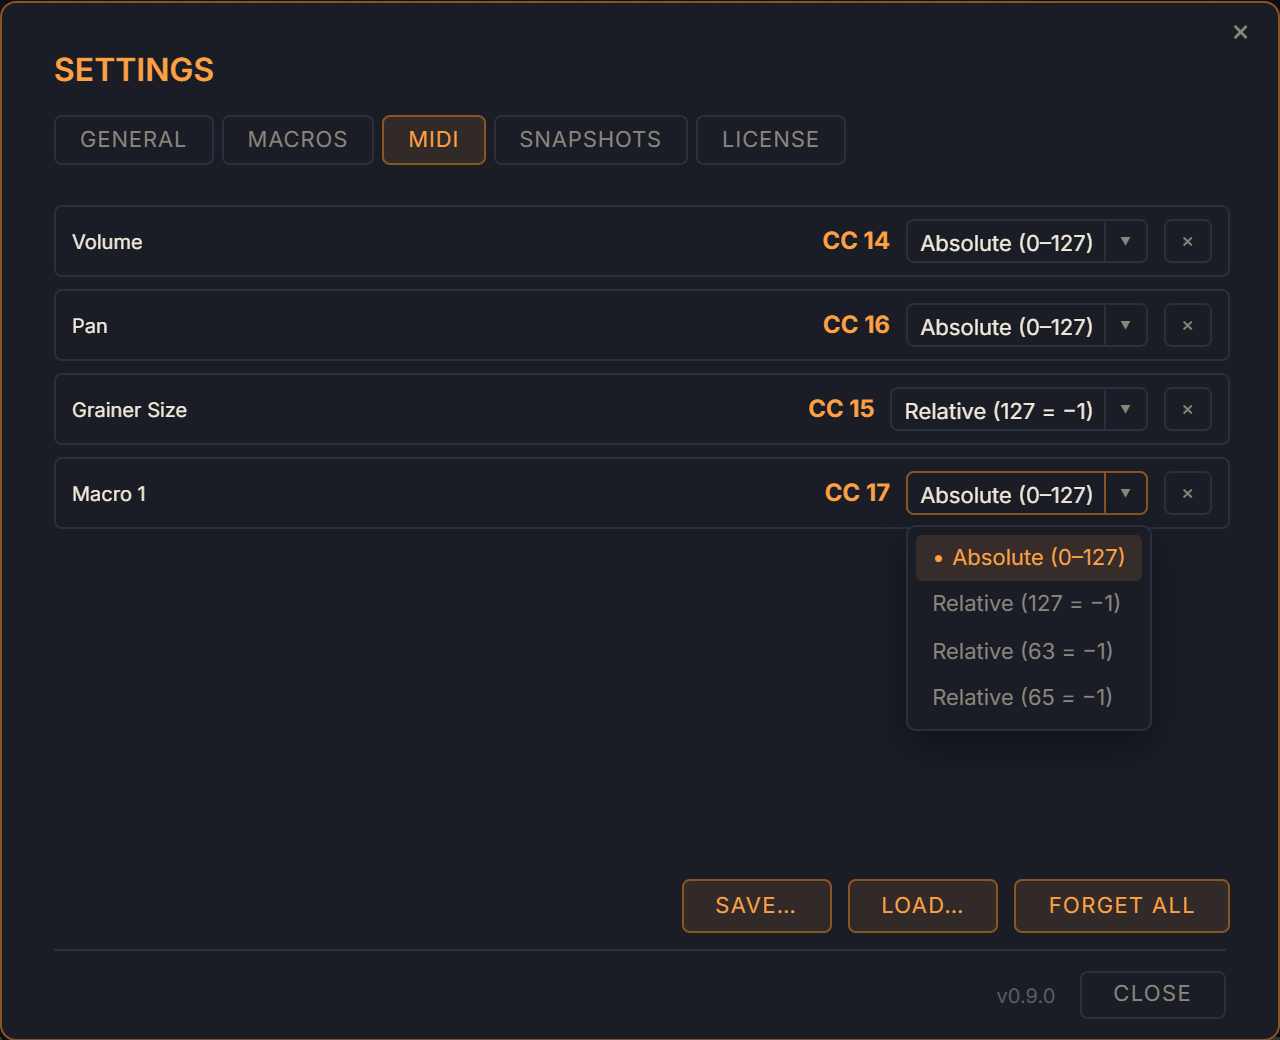
- Control The control the CC is mapped to.
- CC number The controller number that was learned.
- CC Mode How the incoming values are read:
- Absolute for knobs and faders.
- Relative for endless encoders. The three variants differ in the value sent for one step down.
- Remove Forgets this assignment.
- Save and Load Write the assignments to a file and read them back, for use in another project. Loading replaces all current mappings.
- Forget All Removes every assignment.
MIDI Learn assignments are stored with the DAW project, not in presets. They are not a device-wide global controller profile; use Save… and Load… to carry them to other projects. A learned CC keeps working while the plugin window is closed, steering the sound that was shown last.
Make The Workbench yours.
Settings is where The Workbench adapts to the way you play and work: how it responds to your controller, how it looks and where it finds its samples.
- Settings Opens the Settings window. The General tab is shown first.
General
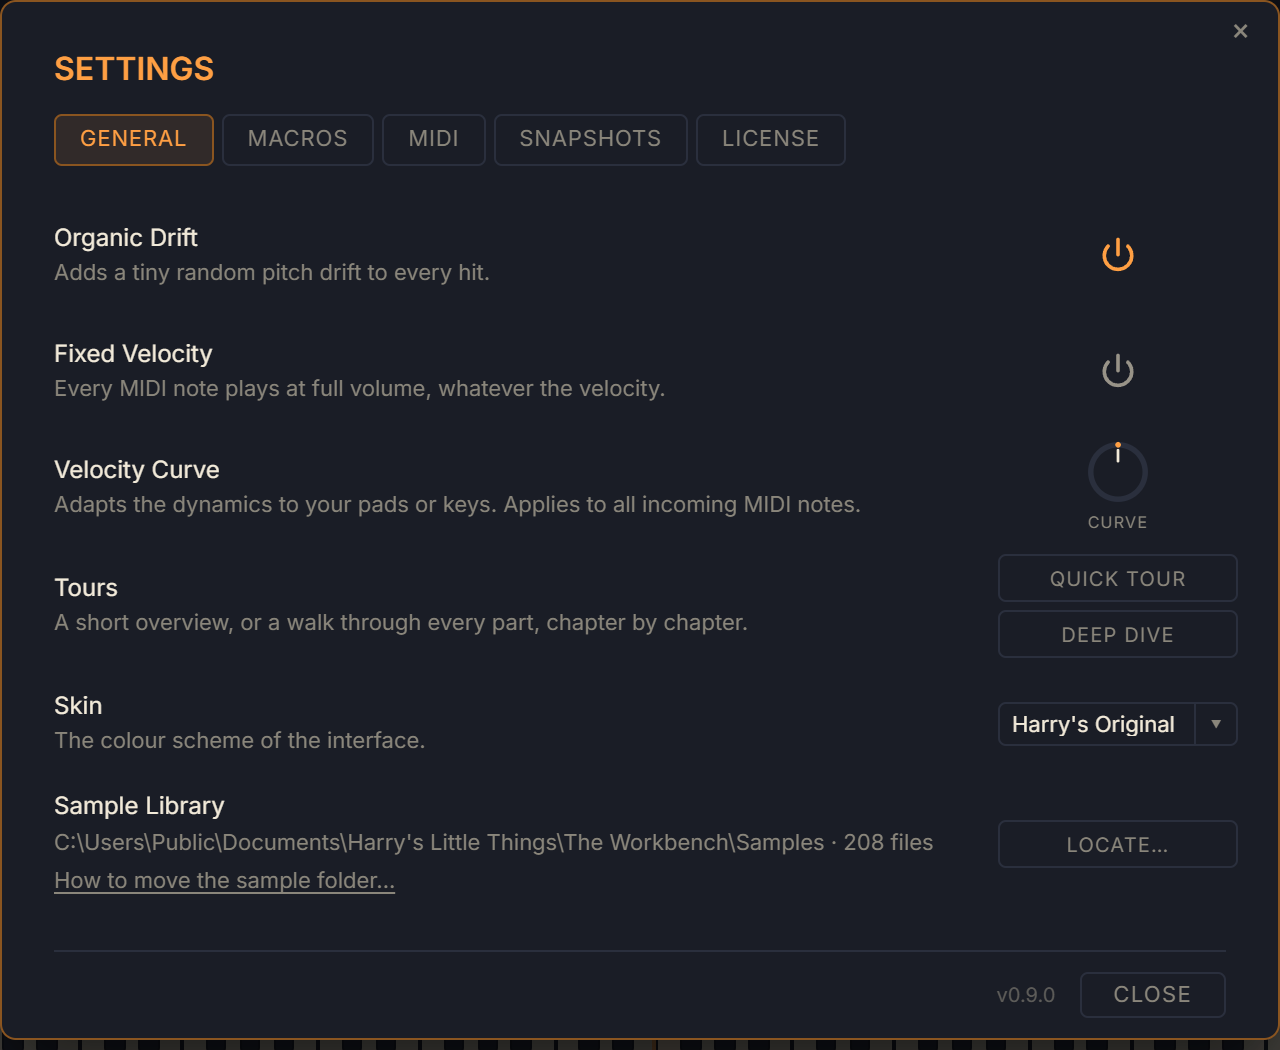
- Tabs We focus on the General tab here. The other tabs are explained in their own sections: Macros, MIDI, Snapshots and License.
- Organic Drift On by default. Every hit gets a tiny random pitch variation of up to ±0.1 semitone, for a more natural feel. Not quite round robins, but Harry likes it.
- Fixed Velocity Plays every MIDI note at full volume, whatever the velocity.
- Velocity Curve
- Shapes the dynamics from Soft to Hard, linear by default.
- Adapts the response to your keys or pads.
- Disabled while Fixed Velocity is on.
- Tours Quick Tour is a short overview, Deep Dive walks through every part, chapter by chapter.
- Skin Changes the colour scheme of the interface. Skins
- Sample Library
- By default, the samples are installed next to the plugin.
- You can keep them wherever you like, as long as the location stays accessible.
- Locate… tells the plugin where its sample library is if it has moved. It is not a sample-import or mapping tool; using a different sample collection is not a supported workflow.
If the plugin cannot find the samples when it opens, it stays locked and shows a lock screen with the Locate… button. Your projects are not affected.
Skins
Skins don't change the sound itself, but they can change your mood. The plugin ships with seven of them. Pick one in Settings › General and see what happens.
Harry won't show you any skins here: that would spoil the fun. Switching is instant and nothing is lost, so try them all.
- Harry’s Original Once upon a time …
- Pen & Paper Be the architect of your sound.
- New Wave Lights off, glow on.
- Studio ’72 Embrace your inner hippie.
- Barista Lab Best enjoyed with a double espresso.
- Silk Road Open Sesame.
- Zero Gravity In space no one can hear …
Save the sound. Keep the performance flexible.
A preset saves the sound of your whole kit, so you can recall it in any project. Presets are stored as XML files, separate from the DAW project state. You find them in the preset selector at the top left of the header.
Preset selector
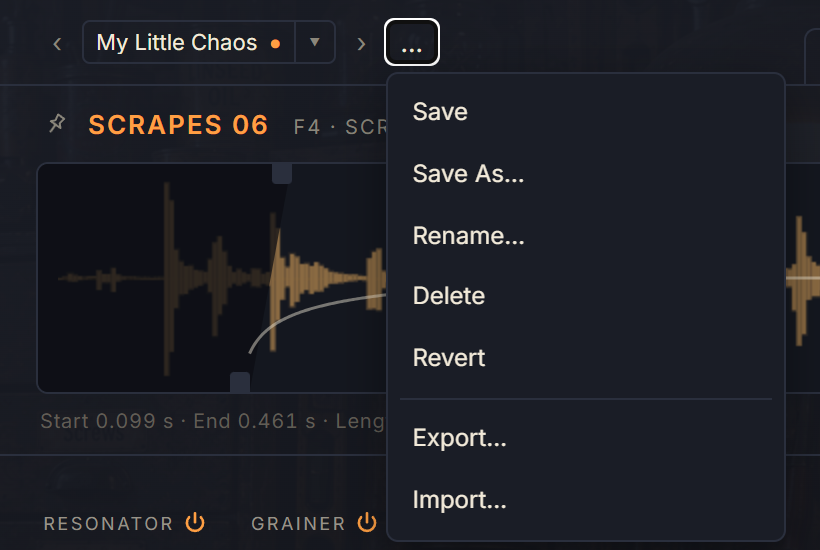
- Previous and next The ‹ › buttons step through your presets.
- Preset name Click it to pick a preset from the list. A dot next to the name marks unsaved changes.
- Actions The entries of the ⋯ menu do what you would expect. Export and Import are handy for swapping presets with friends.
Factory presets ship with the plugin and cannot be overwritten.
User presets are your own and are stored in your user profile. On Windows, they follow you between computers only if your account uses a roaming profile. Otherwise, use Export and Import to move them.
Stored: the settings of every sample, Reverb and Delay, Pad Kits and the active Sample Set of each Group.
Not stored: Master volume, Macros, MIDI Learn and the General settings. They belong to the project, so presets can travel between projects and users.
Keep the sounds you like.
Snapshots are a temporary parking place for sounds, separate from presets and projects. They stay available across sessions until you delete them. Use one to keep a dice roll you like, or to bring a sound from preset A into preset B.
Taking a snapshot
- Snapshot Saves the current sample with all its settings.
- Snapshot list Opens the list of existing snapshots for this particular sample. Snapshot list
In most randomizers a great roll is gone with the next click. Here you can take a snapshot whenever you land on one and keep rolling, so every sound you liked stays a click away. Dice
You can keep up to 100 snapshots. They live in a file of their own, shared by all plugin instances and projects, and are not part of a preset or project. That is why they stay available when you switch presets or projects.
Snapshot list
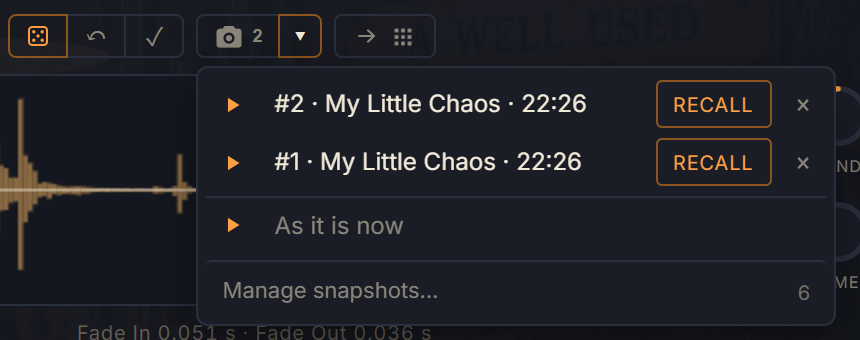
- Play Plays the sample with the snapshot’s settings, without changing your current ones.
- Recall Applies the snapshot to the sample. Nothing changes until you press it.
- Delete Removes the snapshot after you confirm. A deleted snapshot cannot be brought back.
- As it is now Plays your current sound, so you can compare it with the snapshots.
- Manage snapshots Opens Settings › Snapshots. The number is the total of all your snapshots. Manage snapshots
Press play on one snapshot after another, and on As it is now, to compare them with each other. Nothing changes until you press Recall. Super handy for finding the sound that inspires you the most.
Manage snapshots
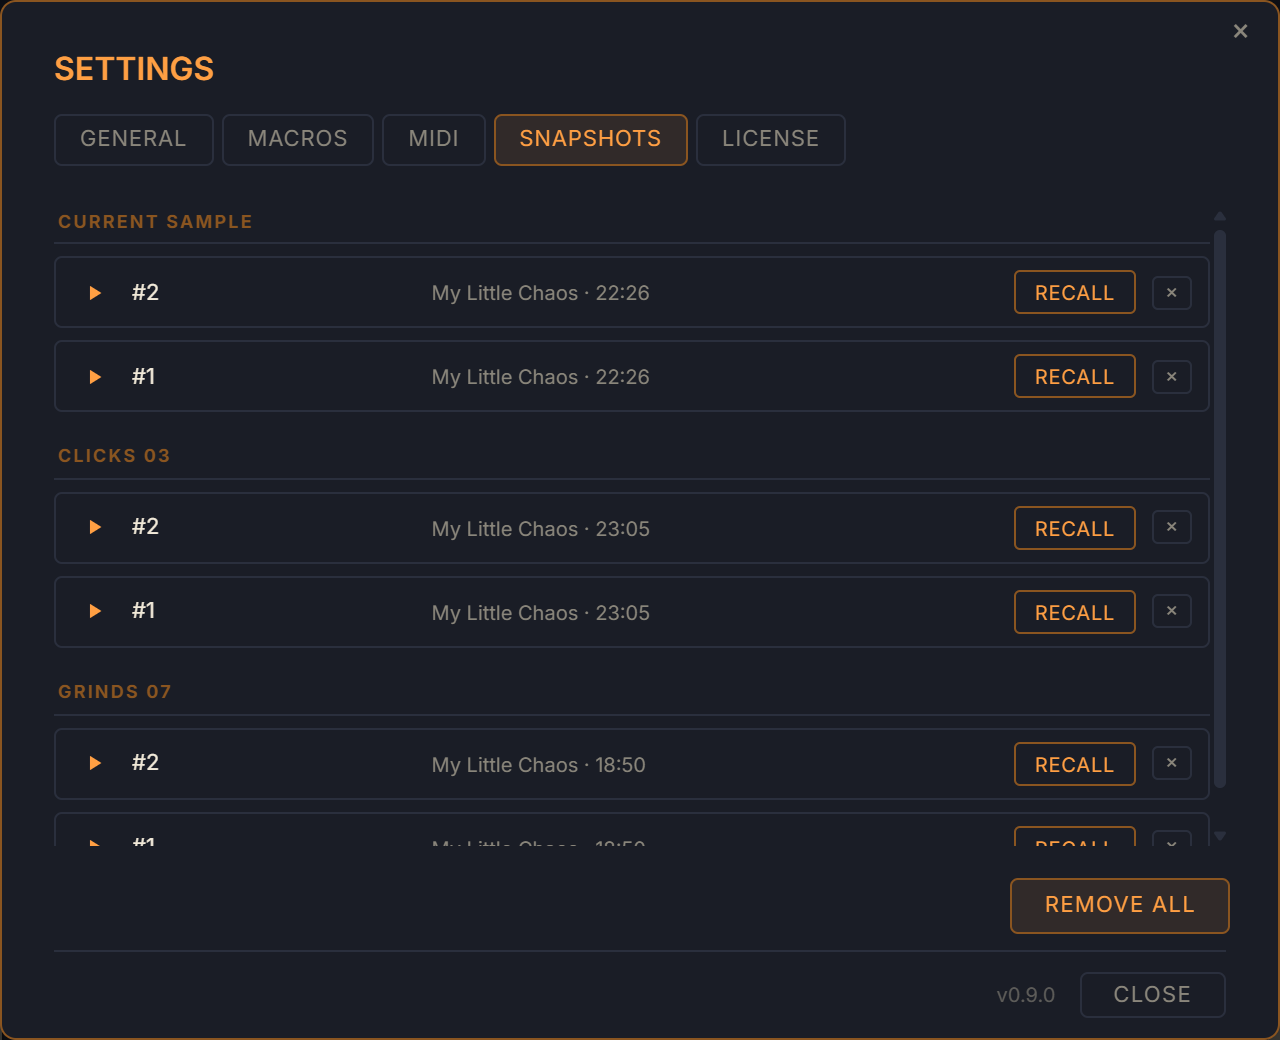
- Grouped by sample All snapshots, with the current sample first.
- Play Previews a snapshot.
- Origin The preset the snapshot was taken from, and the time of day.
- Recall Applies it and jumps to its sample.
- Delete Removes the snapshot.
- Remove All Deletes every snapshot.
A snapshot is bound to the sample it was taken on and can only be recalled onto that same sample.
Paste your key. Keep it for life.
A full license is a single key that you receive by e-mail.
The Workbench runs in Demo mode until you enter a key. Demo mode
Entering your license key
- Settings Opens the Settings window.
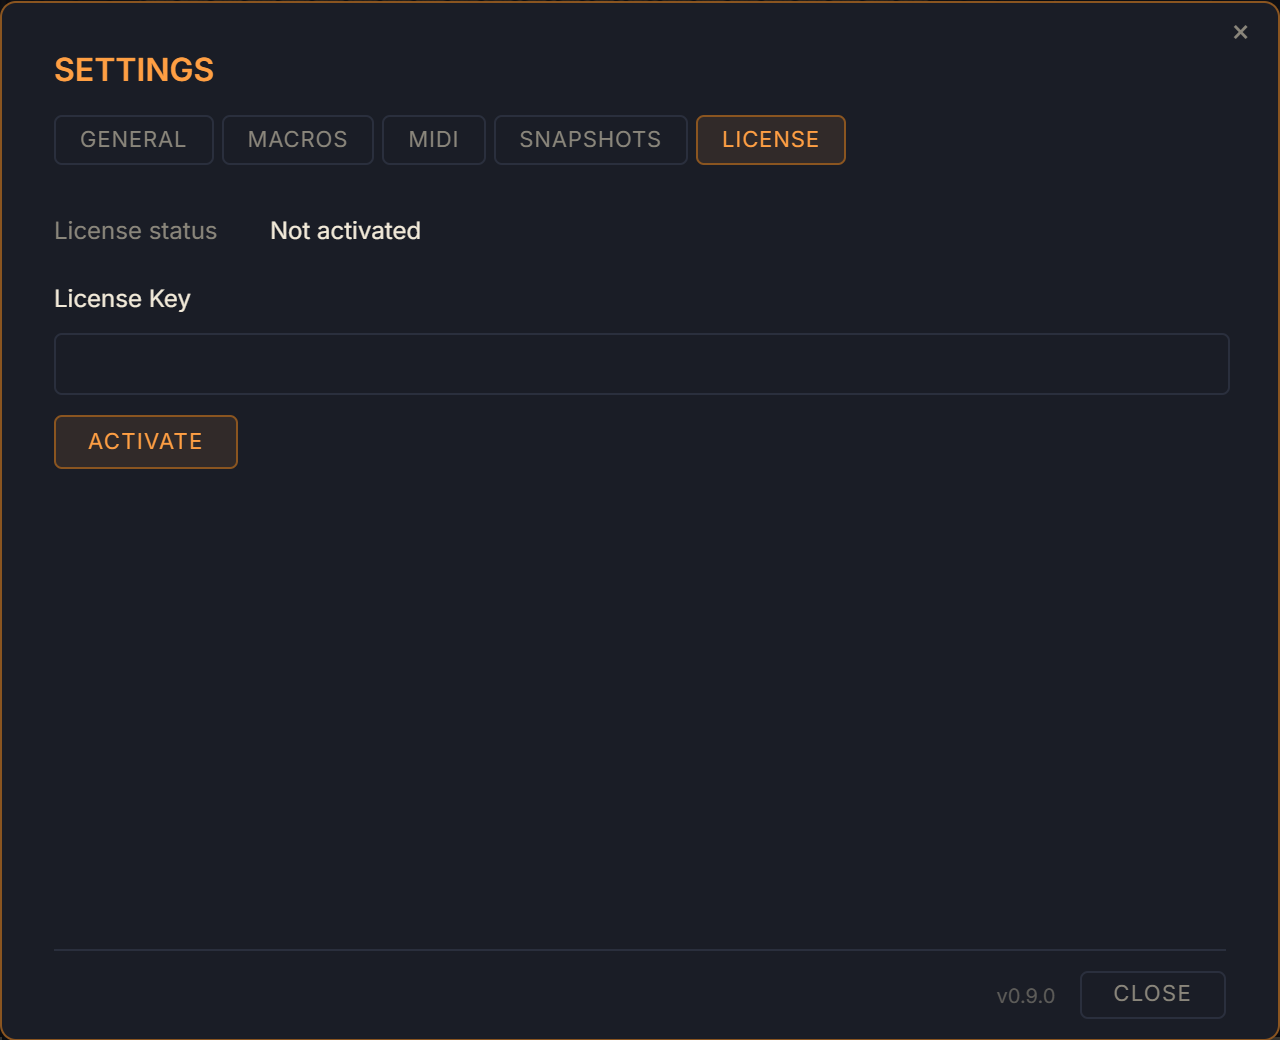
- License tab Choose License in the Settings.
- License status Shows whether The Workbench is activated.
- License key Paste the key from your purchase email.
- Activate Verifies the key on your machine, no internet connection required. The full version starts right away, without a restart.
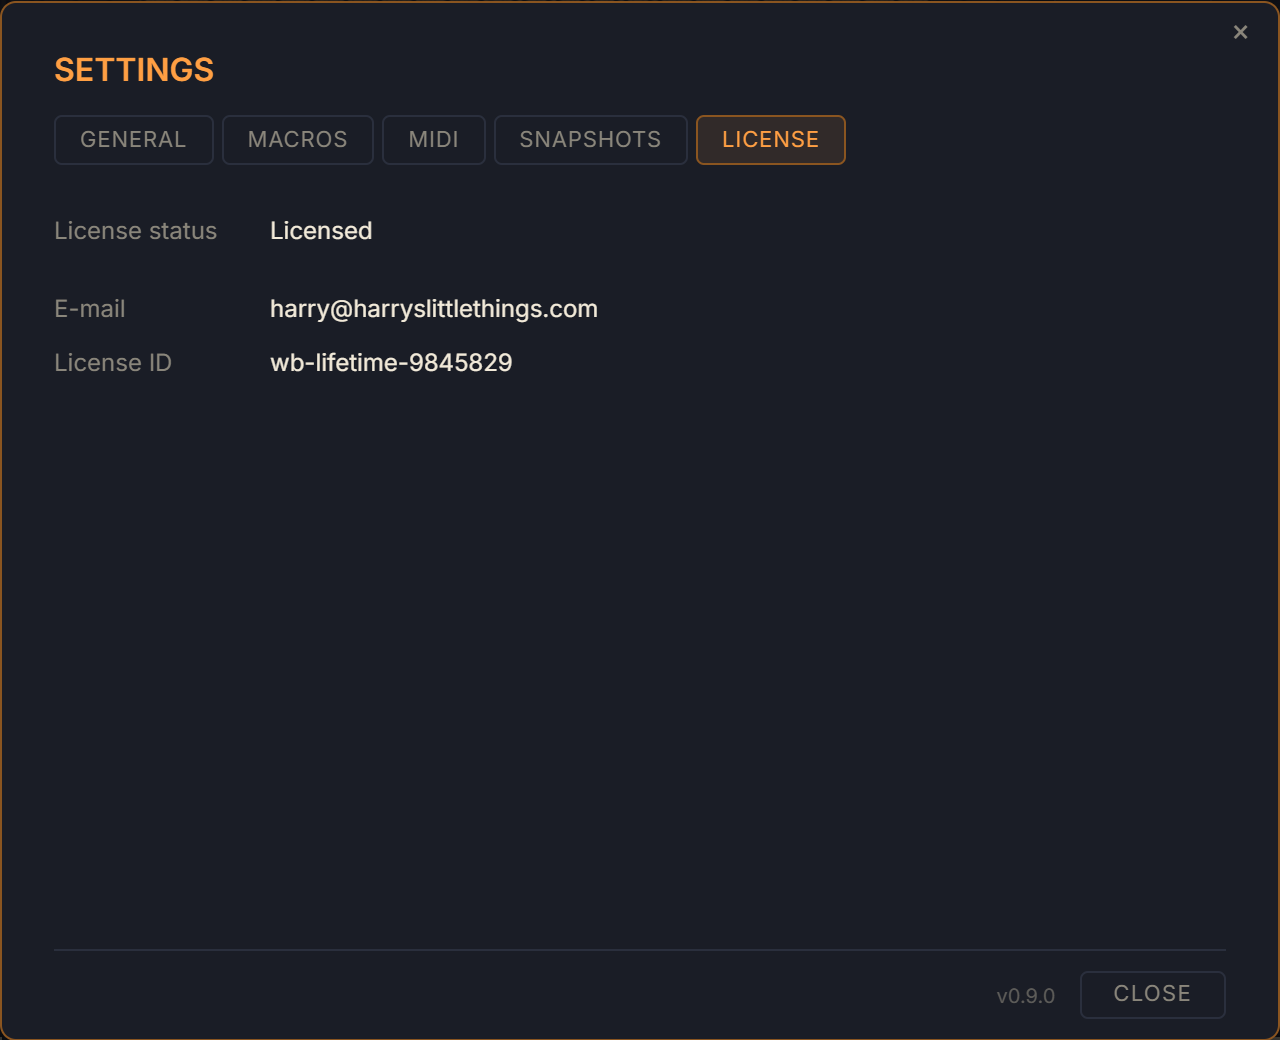
- License status Shows Licensed once the key is accepted.
- E-mail The address the license was issued to.
- License ID The ID of your license.
The license is not tied to a machine, but to you. You can use it on any number of your own computers.
Demo mode
Without a valid license, The Workbench runs in Demo mode. It is fully functional, with a few exceptions:
- 30 minutes per host session, shared by all plugin instances in the same DAW process
- No saving of presets
- No offline rendering: bounce or freeze produces silence
- Project changes aren't saved: if you open and save a project made with a licensed version, its previous plugin state is kept unchanged.
Playing voices fade out and audio stops. The Workbench becomes available again after restarting the host application.
Supported formats.
| Platform | VST3 | AU | Standalone |
|---|---|---|---|
| Windows | Yes | — | Yes |
| macOS 12 or newer (Apple Silicon and Intel) | Yes | Yes | Yes |
AAX (Pro Tools) and Linux are currently not supported. On Windows the plugin’s interface needs the WebView2 runtime, which is already part of Windows 11; the installer sets up the plugin, the Standalone app, the sample library and the Visual C++ runtime. The macOS installer is not notarized yet, so macOS asks you to allow it once under System Settings › Privacy & Security.
The Standalone app has no DAW, so it uses a few keys itself: the space bar plays the selected sample, the left and right arrow keys select the previous and next sample, and the up and down arrow keys jump one octave.
Things worth knowing.
Some limitations are deliberate design decisions while others are current implementation boundaries.
Frequently asked questions.
Can I load my own samples?
The Workbench is designed around its own factory library, not as a general-purpose sampler. It has no supported workflow for importing and mapping your own sample collection. Locate… can point it to the library folder if it has moved; using another sample collection is unsupported.
Why can't I automate every channel knob directly?
With as many as 96 note channels and 32 controls per channel, exposing every control directly would create thousands of automation entries. Macros are the intended bridge between the per-note sound engine and DAW automation. Master, the Macros and the shared Reverbs and Delays are the only parameters your DAW sees.
Are Reverb and Delay separate for every note?
No. There are two Reverbs and two Delays, shared by all sounds. Each individual sound controls how much signal it sends to them (see Reverb & Delay and Sends).
What happens when I release a MIDI note?
By default, nothing: every sound is set to One Shot, which ignores note-off and rings out until the sample (and its tail) has finished or the same key or pad is hit again. Switch a sound to Gate and the matching note-off stops it right away (with a 5 ms fade to avoid clicks). Sustain (CC 64) is ignored.
Why do the controls jump to another sample when I play a note?
In Sample View the controls follow the last note you played. Click the pin next to the sample name to keep them on one sample while you play other notes.
Why does my sound stop early, or ring on after the sample ends?
Check the settings behind the + button next to the Signal heading (Signal panel): Length cuts the tail that the effects add after the sample, and a Filter with high Reso keeps ringing for a while by itself. The button is highlighted whenever Width, Length or the Filter is changed from its default.